Motyl szklarniowy
Treść:
Jeśli zwykła szklarnia nie zmieści się na małej przestrzeni, mieszkańcy lata próbują zrobić małą szklarnię.
Najpopularniejszym sposobem jest naciągnięcie materiału pokrycia na łuki wbijane w ziemię. Jeśli zastosujesz kreatywne podejście, możesz zrobić szklarnię dla motyli, dzięki czemu łatwiej będzie dbać o roślinność. Szklarnia motylkowa jest wykonywana zarówno niezależnie, jak i montowana na zamówienie.
Rozmiar i charakterystyka szklarni motyli
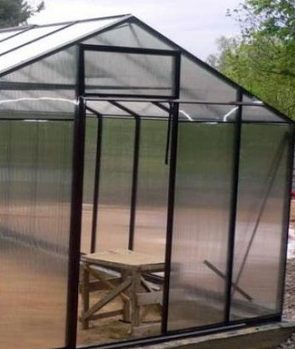
Motyl szklarniowy: zdjęcie
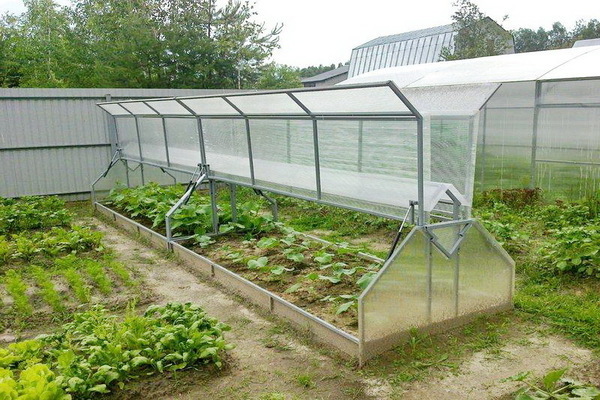
Szklarnia motyla z zamykanymi drzwiami wygląda jak pudełko z łukiem. Klapy znajdujące się po bokach otwierają się do góry. Z jednej strony zainstalowane są 1 lub 2 drzwi, w zależności od długości jałówki. Całkowicie otwarte klapy są jak skrzydełka. Dlatego to imię to motyl.
Producenci wykonują prawie te same projekty w fabrykach, ale różnią się tylko wielkością. Najpopularniejsze szklarnie mają wysokość 1,1 m i szerokość 1,5 m. Szklarnia motylkowa ma długość 4 m. Waga produktu to około 26 kg.
Rama wykonana jest z profilu. Rama wykonana z metalu i tworzywa sztucznego ma dużą niezawodność. Powłoka polimerowa zapobiega szybkiemu niszczeniu metalu. Również ramy wykonane są z ocynkowanego materiału profilowego. Powłoka cynkowa służy mniej niż polimerowa. Szklarnia z tworzywa sztucznego odporna na korozję. Produkt ma niewielką masę, ale nie jest tak mocny jak metalowy profil.
Materiał schronienia. Z reguły szklarnia motylkowa jest wykonana z poliwęglanu, ale można również znaleźć materiał foliowy lub agrowłókno. Zaleca się mocowanie poliwęglanu do ramy. Ponieważ arkusze te są trwałe, dobrze przymocowane okuciami do podstawy, poliwęglan zapewnia pozytywny mikroklimat wewnątrz szklarni. Dodatkowo ten materiał sprawi, że konstrukcja będzie jeszcze sztywniejsza.
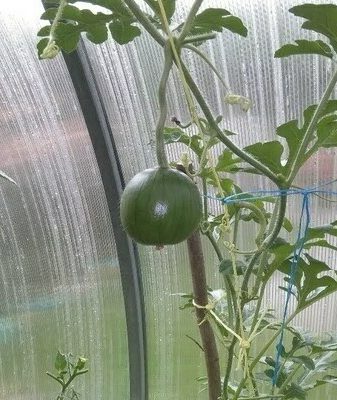
Jeśli szklarnia jest osłonięta poliwęglanem, będzie to ta sama szklarnia, tylko mniejsza. Oczywiście w takiej szklarni nie będzie można uprawiać roślin wysokiego wzrostu, ponieważ ma ona ograniczoną wysokość. Konstrukcja może pomieścić dużą ilość gleby, dlatego doskonale nadaje się do uprawy sadzonek. Gleba w szklarni z poliwęglanu wkrótce się nagrzeje, więc rośliny będą rosły i rozwijały się szybciej.
W szklarni motylkowej można uprawiać wczesne arbuzy, melony, warzywa korzeniowe i wszystkie warzywa o niskim wzroście. Wielu letnich mieszkańców uprawia kwiaty w szklarni tego projektu.
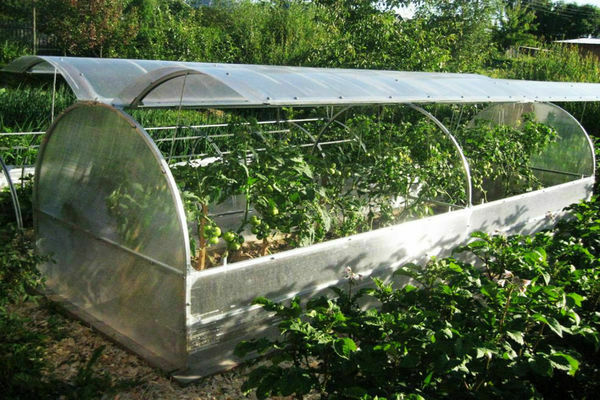
W gorącym sezonie letnim szklarnia pozostaje otwarta. Okiennice zamykane są do późnej jesieni, kiedy pojawiają się przymrozki. W ten sposób wydłuża się czas plonowania warzyw. Wczesną wiosną drzwi są zamykane na noc, aby zapewnić sadzonkom komfort i chronić je przed zatrzaśnięciem.
Możliwe jest również zamontowanie ogrzewania w szklarni za pomocą przewodu grzejnego. W ten sposób stworzysz idealne warunki do uprawy wczesnej kapusty i pomidorów o niskim wzroście.
Jeśli w szklarni uprawiane są różne rośliny, które negatywnie stykają się ze sobą, wewnątrz można wykonać przegrodę szklarniową z poliwęglanu lub polietylenu.
Szklarnia motylkowa: wygodna czy nie? plusy i minusy szklarni
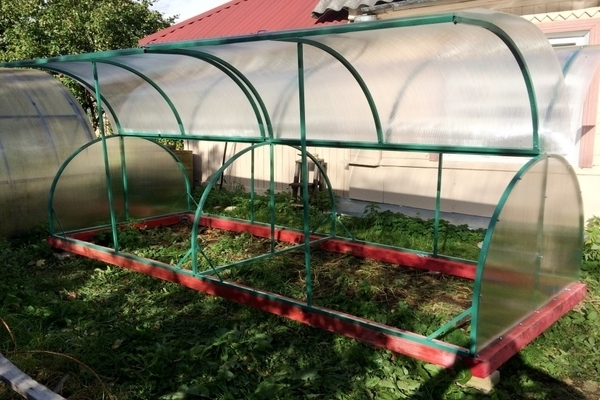
Motyl szklarniowy: zdjęcie
Zalety szklarni motylkowej
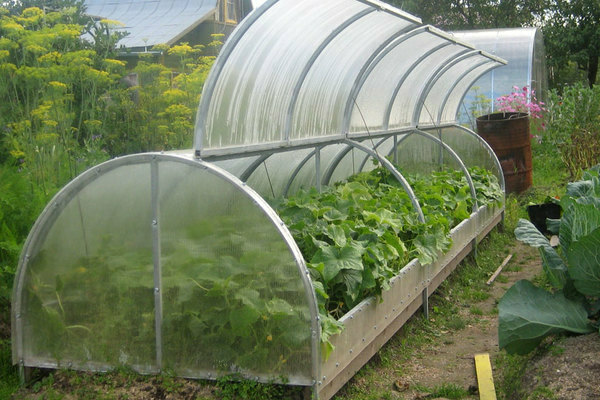
- Producenci i mieszkańcy lata twierdzą, że ten projekt może trwać 10 lat lub dłużej. Tak, taki wskaźnik można osiągnąć, jeśli rama jest osłonięta poliwęglanem.
- Drzwi otwierają się z 2 stron, dzięki czemu łatwiej jest utrzymać kalenicę.Możesz rozbudować własną szklarnię, aby pomieścić więcej roślinności.
- Szklarnia jest lekka i kompaktowa. Może znajdować się w dowolnym miejscu na budowie, jeśli potrzebujesz zdemontować w celu transportu, możesz go również szybko złożyć.
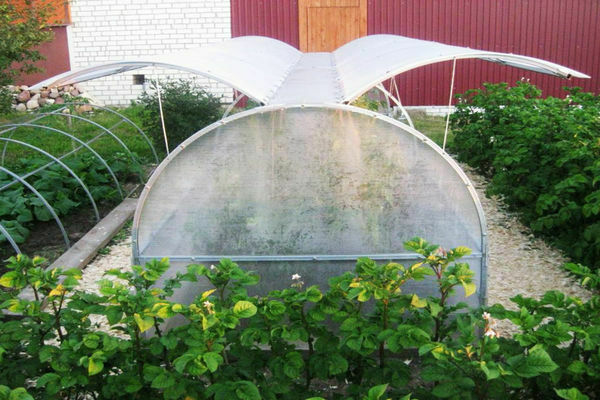
- Bardzo dobrze, gdy taka szklarnia znajduje się w stałym miejscu na fundamencie. Dach łukowy, pokryty wytrzymałym poliwęglanem, nie zawali się pod ciężarem dużej ilości pokrywy śnieżnej i podmuchów wiatru. Latem, kiedy szklarnia jest w pełni otwarta, zwykle uwalniane są z niej długie ogórki. Innymi słowy, motylek jest używany przez cały rok, nie można go zdemontować i nie trzeba go przestawiać w inne miejsce.
Minusy.
- W sklepach są takie szklarnie, których ramy wykonane są z prostego metalowego profilu, pokrytego farbą. W przyszłości farba może się odkleić, a tam, gdzie są przymocowane śruby, natychmiast się odkleja. Według letnich mieszkańców jakość farby jest stale słaba. Rdzewienie ramy zaczyna się, jeśli nie jest od czasu do czasu malowana.
- Otwory na śruby prawie zawsze mają zadziory. Sami mieszkańcy lata usuwają je za pomocą pliku, a tak naprawdę im się to nie podoba.
- Niektóre firmy zalecają schowanie szklarni polietylenem, jeśli nie ma poliwęglanu. To zła rekomendacja, ponieważ konstrukcja staje się mniej sztywna. Dodatkowo twarde krawędzie z poliwęglanu zapewnią jeszcze jeden przystanek dla zamkniętych drzwi w uprzęży poniżej.
- Na motylach, które są produkowane w dużych ilościach, między zamkniętymi drzwiami a korpusem występują duże szczeliny.
- Czasami można znaleźć słabe zawiasy, które wyginają się po otwarciu drzwi.
- Minusem zdemontowanych konstrukcji jest ciągłe uszczelnianie połączeń. Każdego roku, kiedy szklarnia jest montowana, trzeba zainwestować w zakup silikonu.
Aby uniknąć wad motyla szklarniowego z fabryki, możesz to zrobić sam.
Zbieranie motyli z rośliny
Podczas samodzielnego montażu szklarni należy postępować zgodnie z instrukcjami producenta. Algorytm wskazuje, po co się połączyć.
Przybliżony schemat montażu.
W załączeniu rysunek. Na nim za pomocą sprzętu należy zmontować ramę szklarni. Każdy element jest połączony w formie litery „t” lub zapinany narożnikiem.
Do wzmocnienia elementów nośnych na długości ponad dwóch metrów wymagane jest kotwienie w formie krzyża.
Zmontowana rama musi być osłonięta materiałem z poliwęglanu lub polietylenu.
Algorytmy fabryk mogą się różnić, ale podstawa montażu ramy jest identyczna.
DIY szklarnia motylkowa
Samo zrobienie szklarni motylkowej jest bardzo proste.
- Szkolenie.
Aby zrobić schludną estetyczną szklarnię, narysuj jej schemat. Na wykresie wskaż wszystkie elementy ramy, ich rozmiary i punkty mocowania śrub. Zdecyduj od razu na rodzaj drzwi. Mogą być półokrągłe lub nawet.
Łatwiej jest wykonać drzwi o równym kształcie, ponieważ nie zawsze można samodzielnie wygiąć identyczne łuki. - Wybór miejsca do zainstalowania szklarni.
Szklarnia lub pomieszczenie szklarniowe znajduje się z północy na południe. Zalecane jest niezacienione miejsce lub dobrze oświetlone przed obiadem. Konstrukcję można umieścić w dowolnej części terytorium, ale nadal tak, aby można było łatwo podejść do drzwi z obu stron. Weź pod uwagę fakt, że wysokie rośliny i budynki będą zacieniać, ale jednocześnie pogrubione żywopłoty ochronią szklarnię przed zimnymi wiatrami. - Kładziemy fundament.
Zdemontowane szklarnie rzadko są umieszczane na fundamencie. Jeśli użyjesz motyla jako stacjonarnej szklarni, lepiej umieścić go na podstawie. Konstrukcja jest lekka, więc nie ma potrzeby robienia dużego i mocnego fundamentu. Optymalnie powinien być umieszczony na głębokości 500 mm. Podstawą może być pudełko wykonane z drewna, ale jest tu niuans - może szybko gnić w glebie.Zaleca się wykonanie podbudowy z czerwonej cegły, pustaków lub wykonanie szalunku wokół wpustu i wylanie tam betonu. - Jak zrobić ramę z drewna.
Konstrukcję można wykonać samodzielnie za pomocą drewnianych listew i starych okien.
Zrób to sam dla szklarni motylkowej, a następnie wymiary są przenoszone na listwy drewniane o przekroju 30x40 mm lub 40x50 mm. Wszystkie oznaczone elementy są odcinane piłą do metalu. - Montaż ramy odbywa się zgodnie ze schematem. Dach będzie trójkątny i płaski. Drewnianych łuków nie można wyginać, więc zatrzymaj się na równych skrzydłach.
Ościeżnice mocowane są od góry do gotowej podstawy za pomocą zawiasów. Od góry pokryte są polietylenem. Jeśli są stare okna, a raczej ich ramy, mogą służyć jako gotowe drzwi. Okładzina będzie przeszklona z okna. - Z boku stelaż osłonięty deskamiale nie będą przezroczyste. Dobrze sprawdzi się tu folia wzmocniona, pleksi lub poliwęglan.
Jeśli chcesz, możesz pokryć ramę agrofibrą. - Jak zrobić ramkę z metalowego profilu.
Montaż ramy z profilu metalowego jest podobny do montażu ramy drewnianej. Jedyna różnica polega na tym, że drzwi wykonane są w formie półokręgów. Będziesz musiał wygiąć łuki w specjalnym miejscu.
Szklarnia będzie nieruchoma, dlatego wszystkie elementy podstawy muszą być spawane. Wspólna rama wykonana jest zgodnie z rysunkiem, który ma centralną poprzeczkę do mocowania drzwi. Zawiasy przykręcane są do nadproża i skrzydła. Po zamontowaniu gotowej ramy na fundamencie należy ją osłonić materiałem poliwęglanowym. Wycięte elementy mocowane są specjalistycznymi okuciami z podkładkami do uszczelniania. Polietylen i włóknina do metalowej ramy profilowej nie będą działać zbyt dobrze.
Motyl szklarniowy: recenzje
Aleksandra Wasiliewna, 60 lat, obwód irkucki: „Mąż zbudował szklarnię w kształcie motyla ze starych okien. Drzwi zostały zbudowane w taki sposób, aby można je było otwierać pionowo przez cały sezon letni. Dlatego możesz sadzić i uprawiać wysokie pomidory i ogórki ”.
Wiktor Siergiejewicz, 59 lat, obwód tomski: „Stelaż szklarni motylkowej został zakupiony jako gotowy w wyspecjalizowanym miejscu. Kiedy składałem, przerobiłem zawiasy, ponieważ drzwi nie pasowały tak ciasno do ramy. Reszta jest w porządku. Szklarnię pokryto materiałem poliwęglanowym. Szklarnia stoi już od trzech lat.”