Rozmnażanie agrestu: wszystkie metody
Treść:
Artykuł szczegółowo omawia hodowlę agrestu na różne sposoby, w różnych porach roku.
Agrest jest czasami nazywany „winogronem północnym”. Jego główną cechą wyróżniającą jest dobre ukorzenienie. Jeśli gałąź krzewu leży blisko ziemi, natychmiast zacznie zapuszczać korzenie. Później te korzenie z przygodnych fragmentów przechodzą do własnego systemu korzeniowego. Dzięki temu agrest rośnie bardzo szybko.
Agrest ma wyjątkowe zdolności hodowlane, ale eksperci nadal radzą, aby osobiście kontrolować rozmnażanie krzewu. Monitorując rozmnażanie agrestu zawsze będziesz mieć pewność, że nowe sadzonki są wysokiej jakości.
Rozmnażanie agrestu w różnych porach roku

Rozmnażanie agrestu
Przed przystąpieniem do rozmnażania warto zwrócić uwagę na warunki, jakich wymaga agrest do wzrostu korzeni. Po pierwsze, młoda roślina wymaga ciepła. Po drugie, musi mieć dość wody.
Agrest można rozmnażać zarówno wiosną, jak i jesienią. Zwykle wybór sezonu zależy od wybranej metody hodowli.
Załóżmy, że decydujesz się na rozmnażanie agrestu przez nakładanie warstw. Wiosna jest idealna do tej metody, najlepiej wczesna. Wynika to z faktu, że aktywny sezon wegetacyjny rozpocznie się później.
Natomiast młode sadzonki należy sadzić na początku latem. Najlepszym miesiącem na jeszcze zielone sadzonki jest czerwiec. Ale zdrewniałe padają w październiku.
Uniwersalną metodą pod względem sezonu jest dzielenie buszu. Zabieg ten można przeprowadzić zarówno jesienią, jak i wiosną. Wybór, kiedy podzielić krzak, najlepiej opiera się na twoim regionie. Jeśli mieszkasz w ciepłych regionach na południu, rozmnażanie przez podział jest możliwe od późnego lata do połowy jesieni. Na pozostałych obszarach o klimacie przeciętnym podział przeprowadza się wiosną.
Kolejnym czynnikiem przy wyborze rodzaju hodowli jest odmiana agrestu. Każda odmiana ma swoje własne cechy, których nie można zignorować. Dlatego przy rozmnażaniu odmian europejskich należy stosować warstwowanie. Odmiany hybrydowe rozmnażane są przez sadzonki, zielone i mieszane. Nasiona są zwykle wykorzystywane do hodowli nowych odmian. Ale nikt nie zabrania amatorom używania ich do eksperymentów ogrodniczych.
Rozmnażanie agrestu: metody
Rozmnażanie agrestu
Jak już wspomniano, korzenie agrestu rosną bardzo szybko i łatwo. Może być rozmnażany w dowolnym czasie iz dowolnej części rośliny. Prawdopodobieństwo, że agrest się nie zakorzeni, jest bardzo małe. Ponadto jest bardzo bezpretensjonalny. Wszystko to sprawia, że jest to bardzo przystępna roślina dla początkujących i tych ogrodników, którzy nie chcą poświęcać dużo czasu i wysiłku na rozmnażanie.
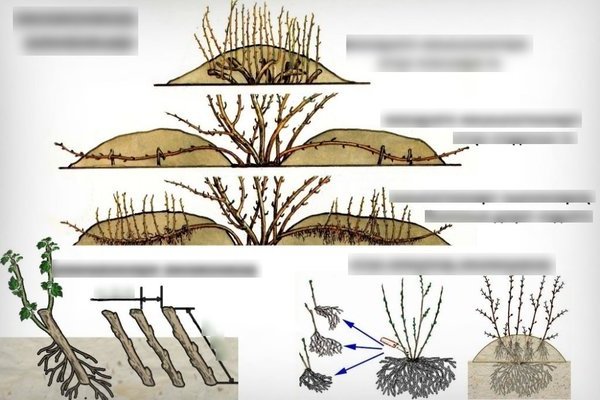
Rozmnażanie agrestu przez nakładanie warstw
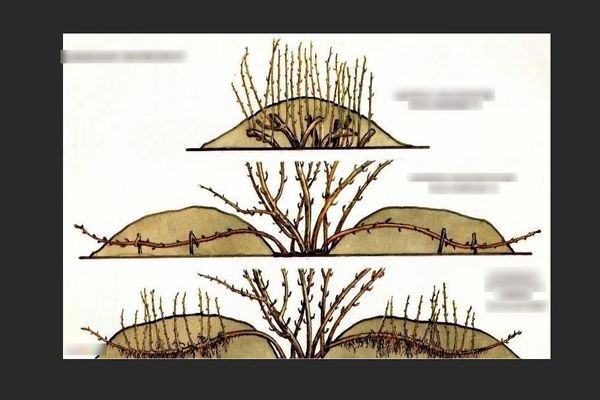
Rozmnażanie agrestu przez nakładanie warstw
Zaletą tej metody jest jej skuteczność: sadzonki rzadko się zapuszczają. Najbardziej optymalny czas na taką reprodukcję to październik. Jednak proces rozmnażania przez nakładanie warstw jest możliwy na wiosnę. Jedyna trudność polega na tym, że trzeba być na czas przed rozpoczęciem okresu płynięcia soków i rozmnażać się pod koniec marca lub na początku kwietnia. Do rozmnażania przez odkładanie najlepiej nadają się krzewy w wieku powyżej 3 lat i poniżej 5 lat.
Przed rozpoczęciem hodowli należy wyrwać wszystkie chwasty w pobliżu krzewu. Następnie wokół krzaka umieszcza się zgniły obornik, kopiąc w ziemi 10 cm, a następnie wyrównuje.
Do hodowli agrestu najlepiej przygotować rok wcześniej. Na rok przed planowaną hodowlą agrestu z krzaka wycina się gałęzie, które nie nadają się do układania warstw.Należą do nich słabe i chore gałęzie. Następnie z agrestu wyrosną nowe gałęzie, które będą już wystarczająco silne, aby nadawały się do hodowli.
Propagacja przez warstwy poziome
Dla takiej reprodukcji istnieje prosty plan działania:
1. Weź rozgałęzioną część buszu. Powinien być już dorosły i bez chorych gałęzi. Musisz wybrać kilka gałęzi, które rosną blisko ziemi. Oddziały muszą mieć co najmniej 1 rok i nie mogą być starsze niż 3 lata.
2. Wybrane gałęzie należy skrócić. Musisz odciąć roczny przyrost. Dzięki tej procedurze pąki lepiej rosną i odpowiednio uzyskuje się mocniejsze gałęzie i mocniejszy system korzeniowy.
3. Po pierwszych dwóch krokach gałęzie umieszcza się w podłużnych dołach o płytkiej głębokości. Następnie są naprawiane. Do mocowania możesz użyć szpilek lub dowolnych innych haczyków wykonanych z metalu lub drewna.
4. Otwory są pokryte ziemią i podlewane. Pierwsze podlewanie powinno być obfite. Następnie rowy z gałęziami są pokryte ściółką.
5. Przez cały sezon musisz regularnie podlewać, a także nawozić. Odpowiednie są zarówno nawozy mineralne, jak i organiczne.
6. Kiedy kiełki osiągną około 8 cm, są skulone, ale niewiele. Będziesz musiał to powtórzyć po dwóch tygodniach od pierwszego razu.
7. Gdy gałęzie mają mocne korzenie, są odcinane i wykopywane.
Ważne jest, aby wiedzieć, że aby sadzonki rosły szybciej, należy je wykopać razem z grudką ziemi.
Gałęzie i korzenie młodej sadzonki muszą być oswojone. Następnie musisz posadzić sadzonkę, aby rosła dalej. Kiedy minie rok od posadzenia, wyrosną normalne sadzonki z kilkoma gałęziami i dobrymi korzeniami.
Propagacja przez warstwy pionowe
Pionowe nakładanie warstw jest nużące, jeśli twoja roślina jest stara. Następnie służą do jej odmłodzenia.
1. Zabiegi należy przeprowadzać od początku wiosny. Wszystkie gałęzie są przycinane. Stare gałęzie są całkowicie odcięte. Warto wziąć pod uwagę, że gałęzie są uważane za stare, których wiek wynosi 2-3 lata. Świeże gałęzie należy ciąć tylko 2/3 całej długości gałęzi. Wszystko to jest konieczne, aby krzew aktywniej rósł świeże gałęzie.
2. Po tym, jak krzak wyda nowe gałęzie, a one z kolei urosną do 15 cm długości, możesz przejść do następnego kroku. Krzew jest skulony, a następnie posypany ziemią przez około połowę.
3. Przez całe lato musisz oglądać krzak. W razie potrzeby powtórz drugi krok. Jeśli twój krzew nadal potrzebuje hilling, to przed ponownym przenoszeniem należy go dobrze podlać.
4. Latem przyszłe sadzonki są dokarmiane. Roztwór mineralny do krzewów jagodowych doskonale nadaje się do karmienia.
5. W połowie jesieni przesadza się warstwy, które już się zakorzeniły.
Należy pamiętać, że proces rozmnażania przez odwarstwianie polega na pokryciu gałęzi ziemią. Oznacza to, że po tym krzew nie przyniesie owoców przez dwa lata.
Musisz upewnić się, że między pędami jest przestrzeń i że jest jej wystarczająco dużo. Jest to szczególnie ważne w okresie ich wzrostu. Jeśli ten warunek nie zostanie spełniony, korzenie będą się ze sobą zaplątać w miarę wzrostu. Mogą przeplatać się do tego stopnia, że podczas przeszczepu nie mogą ulec uszkodzeniu. Ponieważ pędy są młode, uszkodzenie ich korzeni może doprowadzić do ich śmierci.
Reprodukcja przez warstwy łukowate
W przypadku większości odmian agrestu obowiązuje zasada: gałązki mają zwykle kształt łuku. Jak już wspomniano, agrest zaczyna się zakorzeniać przy dłuższym kontakcie z ziemią. Dlatego ta metoda rozmnażania występuje sama, bez interwencji człowieka. Ale jeśli chcesz przyspieszyć proces i uczynić go bardziej wydajnym, możesz przeprowadzić następujące procedury:
1. W miejscu, w którym gałąź styka się z ziemią, należy zrobić mały otwór.
2. W tym otworze musisz umieścić gałąź i ją naprawić.
3. Następnie nawóz wlewa się do dołu - humus.Po umieszczeniu nawozu uformuj mały stos na wierzchu.
Jesienią, w środku, gałąź powinna już dobrze się zakorzenić. Dlatego jest odcinany od samego końca i przesadzany. Jeśli korzenie nie są wystarczająco mocne, sadzonki można uprawiać. Jeśli wszystko jest w porządku, posadź na stałe.
Jedyną i główną wadą tej metody jest to, że otrzymujesz tylko jeden nowy krzak.
Wieloletnie gałęzie
Agrest bardzo się zapuszcza. Ta zasada nie ignoruje nawet starych gałęzi. Zwykle takie gałęzie są odcinane, ale potem nie trzeba ich wyrzucać. Stare gałęzie, podobnie jak nowe, można wykorzystać do dalszego rozmnażania.
Proces hodowli według oddziałów:
1. Odetnij starą gałąź.
2. Tę gałąź umieszcza się w przygotowanej dziurze lub po prostu w ziemi. Większość oddziału powinna znajdować się pod ziemią.
3. Pędy na gałęzi muszą zostać odcięte. To da impuls do wzrostu nowych.
4. Latem należy obserwować aktywne podlewanie. Ponadto w sezonie trzeba kilkakrotnie karmić roślinę. Do nawożenia stosuje się nitrofoskę w stosunku 20 mg na 1 m2. lądowania na licznikach.
5. Przeszczep można wykonać po osiągnięciu przez nowe krzewy około 20 cm wysokości.
Jest inny sposób dla tych, którzy nie są bardzo pewni pierwszego:
1. Pobiera się stary krzew agrestu w wieku 5 lat lub więcej. Z niego wybierany jest oddział. Gałąź nie powinna być chora ani słaba, a także wyrastać z krawędzi buszu.
2. Korzenie tnie się na głębokość około 25 cm, tę procedurę najwygodniej wykonuje się łopatą. Krzew jest wyrwany z ziemi. Jak już wspomniano, ważne jest, aby ziemia była zakorzeniona. W tej formie krzew jest przesadzany.
3. Konieczne jest przeszczepienie do wcześniej wykonanego dołu. Następnie musisz wypełnić go ziemią i dobrze podlać.
Podział
Podział stosuje się najczęściej do starych krzewów w celu ich ratowania. W ten sposób otrzymasz młode krzaki od starych i umierających.
Proces dzielenia buszu wygląda następująco:
1. Krzew jest wykopany z ziemi. Bardzo ważne jest, aby robić to ostrożnie, aby nie uszkodzić korzeni krzewu.
2. Korzenie są oczyszczane z ziemi, która do nich przylgnęła. Wszystkie korzenie muszą być dokładnie zbadane pod kątem różnych chorób. Jeśli nadal są chore lub uszkodzone korzenie, są one odcinane. Pęd, który wyrósł z tych korzeni, również zostaje odcięty.
3. Teraz rozważ sam krzak. Musisz wybrać najmłodsze i nie chore gałęzie. Korzenie gałęzi muszą być mocne. Następnie wybrane gałęzie są odcinane od krzaka.
4. Te gałęzie to sadzonki, które należy przesadzić.
Rozmnażanie agrestu przez sadzonki
Ta metoda nie jest odpowiednia dla początkujących. Ma jednak ogromną przewagę nad innymi. Przez sadzonki możesz uzyskać wiele młodych krzewów naraz.
Rozmnażanie przez sadzonki odbywa się w ciepłych warunkach. Może to być szklarnia lub po prostu film na krzakach. Oto główna wada rozmnażania przez sadzonki. Nie wszystkie krzewy zakorzeniają się po przesadzeniu ze szklarni i schronów. Dlatego ta metoda jest polecana doświadczonym ogrodnikom. Wynika to z gwałtownej zmiany warunków temperaturowych. Aby zwiększyć prawdopodobieństwo przeżycia, musisz stopniowo przygotowywać roślinę do nowych warunków. Aby zapobiec obumieraniu rośliny, na kilka tygodni przed sadzeniem w innym miejscu folia zaczyna być usuwana. Obniżają również wilgotność i powodują rzadsze podlewanie. Ważne jest, aby robić to wszystko stopniowo.
Bardzo ważne jest zwrócenie uwagi na etap rozwoju sadzonek. Ma również bezpośredni wpływ na to, czy sadzonki umrą podczas przeszczepu, czy nie. Jeśli sadzonki są nadal zielone lub już zdrewniałe, nie zakorzenią się dobrze. Młode sadzonki mogą po prostu gnić z wilgoci, a zbyt stare sadzonki nie zapuszczają się tak dobrze.
Zielone sadzonki
Rozważ cechy sadzenia młodych sadzonek.
Są bardzo wybredne pod względem warunków temperaturowych. W ciągu dnia temperatura nie powinna przekraczać 23 stopni, aw nocy - 21 stopni. Nie powinna też spaść poniżej odpowiednio 18 i 16 stopni.Ważna jest również temperatura wody. Najbardziej optymalnym rozwiązaniem jest podlewanie letnią wodą.
Jeśli temperatura w szklarni lub pod folią przekracza 25 stopni, sadzonki po prostu zgniją.
Aby ułatwić stworzenie pożądanych warunków temperaturowych, konieczne jest sadzenie sadzonek latem. Początek lata, jego pierwsza połowa, koniec czerwca - początek lipca najlepiej nadaje się.
Proces hodowli agrestu z młodymi sadzonkami przebiega następująco:
1. Nowy wzrost jest odcięty od krzaka. Ważne jest, aby robić to, gdy pogoda jest odpowiednia. Może to być wczesny poranek albo wilgotny, zimny dzień.
2. Powstały pęd jest podzielony na kilka części. Długość kawałków powinna wynosić od 8 do 15 cm, ważne jest, aby zrobić to dobrze naostrzonym nożem.
3. W celu aktywnego wzrostu powstałe sadzonki przeciera się nadmanganianem potasu. Jest jeszcze jedna opcja: umieść go w stymulatorze wzrostu na jeden dzień.
4. Sadzonki są dokładnie myte czystą wodą. Sadzenie odbywa się w doniczkach. Pojemnik na sadzonki powinien być zawsze mały. Aby przyspieszyć wzrost korzeni, materiał do sadzenia jest pokryty folią. Musisz je również regularnie wietrzyć.
5. Kiedy sadzonki zakorzenią się, możesz je bezpiecznie przesadzić.
Sadzonki zdrewniałe
Sadzonki tego typu można przygotowywać nie tylko wiosną, ale również jesienią. Zawsze musisz zebrać o wiele więcej sadzonek niż potrzebujesz. Na przykład dwa razy więcej. Wynika to z faktu, że nie wszystkie sadzonki się zakorzeniają.
Proces hodowli agrestu z sadzonkami przebiega następująco:
1. Jeśli zbiór sadzonek nastąpi jesienią, musisz to zrobić przed sadzeniem. Jeśli na wiosnę, to aż pąki puchną. W przypadku sadzonek pobierane są silne gałęzie, ich górna część. Sadzonki powinny wynosić od 8 do 15 cm, jeśli cięcie zostanie pobrane z dna gałęzi, zmniejsza się prawdopodobieństwo przeżycia.
2. Jesienne sadzonki sadzi się w środku sezonu. Wiosną wręcz przeciwnie, na początku. Ważne jest, aby ziemia była już rozmrożona. Jeśli nie zamierzasz ich wkrótce sadzić, musisz je przetworzyć za pomocą stymulatorów wzrostu. Po przetworzeniu umieścić w wilgotnym kawałku materiału, włożyć do torby lub plastikowej folii i umieścić w chłodnym miejscu. Torba lub folia nie powinny całkowicie izolować sadzonek, aby utrzymać wilgoć w środku.
3. Sadzenie sadzonek pod kątem. Kąt powinien wynosić 45 stopni. Odległość między nasadzeniami powinna wynosić około 20 cm, nachylenie sadzonek jest konieczne, aby korzenie rosły szybciej.
4. Gdy cięcie jest już w glebie, należy je naprawić i podlać. Musisz powoli podlewać, aby nie przemieścić łodygi.
5. Wokół sadzonki umieszcza się 5 cm warstwę ściółki.
Jeśli sadzonki zostaną posadzone jesienią, to podczas ciepłej pogody należy poluzować ziemię wokół sadzonek.
Jeśli zimą sadzonki trochę wyjdą z ziemi, to w porządku. Umieść je głębiej i bezpiecznie.
Przez całe lato musisz uważnie monitorować przyszłe krzewy: nawozić, podlewać i rozluźniać ziemię.
W każdym ze sposobów ukorzeniania sadzonek ważne jest poznanie jednej cechy. Ziemia powinna być zawsze wilgotna. Stopniowo wraz ze wzrostem sadzonek wilgotność zmniejsza się do tej, która występuje na otwartym polu.
Połączone sadzonki
Jak nazywa się połączone sadzonki? To młoda zielona łodyga, której dolna część jest już zdrewniała. Takie sadzonki są dostarczane ze stojakiem, z piętą i kulą.
Połączone sadzonki sadzi się pod koniec sezonu wiosennego. Długość pędów do tego czasu powinna wynosić około 6 cm.
Jeśli na rękojeści jest stare drewno, jest to mniej kapryśne w stosunku do warunków. Dlatego takie cięcie znacznie lepiej się zakorzenia.
Posiew
Jak już wspomniano, nasiona są doskonałą opcją do hodowli nowej odmiany. Wynika to z faktu, że krzewy uzyskane z nasion nie noszą cech oryginalnego krzewu.
Proces hodowlany:
1. Weź dojrzały agrest, weź z nich nasiona. Nasiona umieszcza się w piasku, dokładnie miesza, umieszcza w pojemniku.
2. Przed nastaniem chłodu pudełko lub inny pojemnik z nasionami umieszcza się pół metra w ziemi i przykrywa ziemią od góry do połowy głębokości dołu.
3.Po nadejściu wiosny zawartość pojemnika wysiewa się w szklarni. Następnie musisz nawozić warstwą torfu.
4. Przez całe lato musisz uważnie monitorować kiełki. Można je przesadzić pod koniec października.
Wniosek
Rozmnażanie agrestu to dość prosty proces, z którym poradzi sobie każdy początkujący. Wszystkie czynności są bardzo proste i nie wymagają specjalnych umiejętności. Przy wyborze sposobu sadzenia warto zwrócić uwagę na sezon i odmianę agrestu. Musisz także wziąć pod uwagę liczbę pożądanych krzewów. Aby nowy krzew był silny i zdrowy, należy go regularnie nawozić i podlewać.
Rozmnażanie agrestu